How to Set Up a Home Recovery Room After Surgery

You know how fast hospital discharges happen these days. According to 2025 data from the Centers for Medicare and Medicaid Services, outpatient procedures now make up over 60% of all surgeries in the US. The hospital stay is brief, but the real healing happens in your own house.
A well-planned space plays a critical role in how quickly and safely your loved one heals.
We established our professional service team to help families manage this exact transition. Setting up the environment properly prevents complications and reduces caregiver strain. It also helps your loved one regain independence faster.
Let’s look at the data, what it is actually telling us, and explore practical ways to respond. I am going to walk through the exact setup our team uses for home recovery.
Choosing the Right Room
Not every bedroom in your home works equally well for healing. The ideal space minimizes fall risks and keeps essential items within reach.
- Ground-floor location: Stairs are dangerous for patients and exhausting for those with limited mobility. If a ground-floor bedroom is unavailable, consider converting a dining room or den temporarily.
- Private bathroom access: Proximity to a bathroom reduces fall risk during the most dangerous activity, which is getting up at night. A room with an attached bathroom is ideal.
- ADA-compliant spacing: The Americans with Disabilities Act (ADA) recommends leaving at least 36 inches of clear floor space beside the bed for wheelchair or walker access.
- Temperature control: The ideal room temperature for sleep and recovery is between 65 and 68 degrees Fahrenheit.
- Natural light: Windows boost mood and help regulate sleep-wake cycles to accelerate healing.
- Electrical outlets: A hospital bed, phone charger, bedside lamp, and medical devices all need power.
If your home layout forces compromises, prioritize ground-floor access and bathroom proximity above all else.
The Hospital Bed: Your Recovery Room Foundation
A hospital bed is the single most impactful investment for home care. Unlike a regular mattress, this equipment lets the patient adjust their position for eating, breathing, wound care, and sleep without straining surgical sites. It also raises to a safe transfer height and lowers to prevent falls.
We highly recommend reviewing Medicare Part B guidelines if cost is a concern. The 2025 guidelines show Medicare covers 80% of the cost of a hospital bed at home if your doctor deems it medically necessary and prescribes it as durable medical equipment (DME). You simply need to meet the annual Part B deductible, which is $257 for 2025.
Which Type for Recovery?
Our team typically recommends a fully-electric hospital bed for post-surgical patients. The patient can make their own adjustments using the pendant control without calling for help every time they need to reposition.
If budget is a primary consideration, a semi-electric bed handles head and foot adjustments electrically while using a manual crank for height.
Patients recovering from hip or knee surgery may be disoriented from pain medication. An ultra-low hospital bed drops close to the floor and adds an essential layer of protection. Elderly patients in particular benefit from beds designed specifically for seniors that prioritize safe transfers and fall prevention.
Bed Type Comparison
| Feature | Semi-Electric | Fully-Electric | Ultra-Low |
|---|---|---|---|
| Head/Foot Adjustment | Electric | Electric | Electric |
| Height Adjustment | Manual Crank | Electric | Electric |
| Fall Risk Protection | Standard | Standard | Highest |
| Caregiver Strain | Moderate | Low | Low |
Positioning the Bed
Place the bed strategically for safety and convenience.
- The primary caregiver access side must face the room’s open space rather than a wall.
- The patient should be able to see the door from the pillow.
- An electrical outlet must be within reach without using extension cords.
- The path between the bed and bathroom should be short, straight, and obstacle-free.
For detailed sizing and room layout guidance, see our hospital bed sizing guide.

Fall Prevention: Your Top Safety Priority
Falls are the number one complication during home recovery. A 2026 analysis found that over 51% of adult inpatient falls occur while getting in or out of bed.
The combination of pain medication, muscle weakness, unfamiliar equipment, and nighttime bathroom trips creates a perfect storm. We focus heavily on building prevention into every aspect of the room. This approach dramatically reduces the risk of readmission.
Flooring and Clearance
Remove all area rugs and loose mats because they are severe tripping hazards. If the floor is a hard surface like tile or hardwood, place a single non-slip mat directly beside the bed where the patient’s feet land during transfers. Use non-slip pads under any furniture legs that might slide if grabbed for balance.
Lighting Upgrades
Install nightlights along the path from bed to bathroom. Keep a touch-activated lamp on the bedside table so the patient does not have to fumble for switches in the dark. Consider motion-activated lighting strips along the baseboards for immediate visibility.
Grab Bars and Handrails
Install grab bars beside the toilet and in the shower or tub. ADA guidelines require grab bars to be mounted 33 to 36 inches above the finished floor and capable of supporting at least 250 pounds.
If the hallway to the bathroom is longer than a few feet, consider a temporary handrail. The hospital bed’s side rails serve as the primary grab bars at the bedside.
Decluttering the Space
Remove all obstacles between the bed and bathroom, including shoes, cords, furniture legs, and pet beds. Keep the floor completely clear within the patient’s walking path. Tape down any electrical cords that cross walkways.
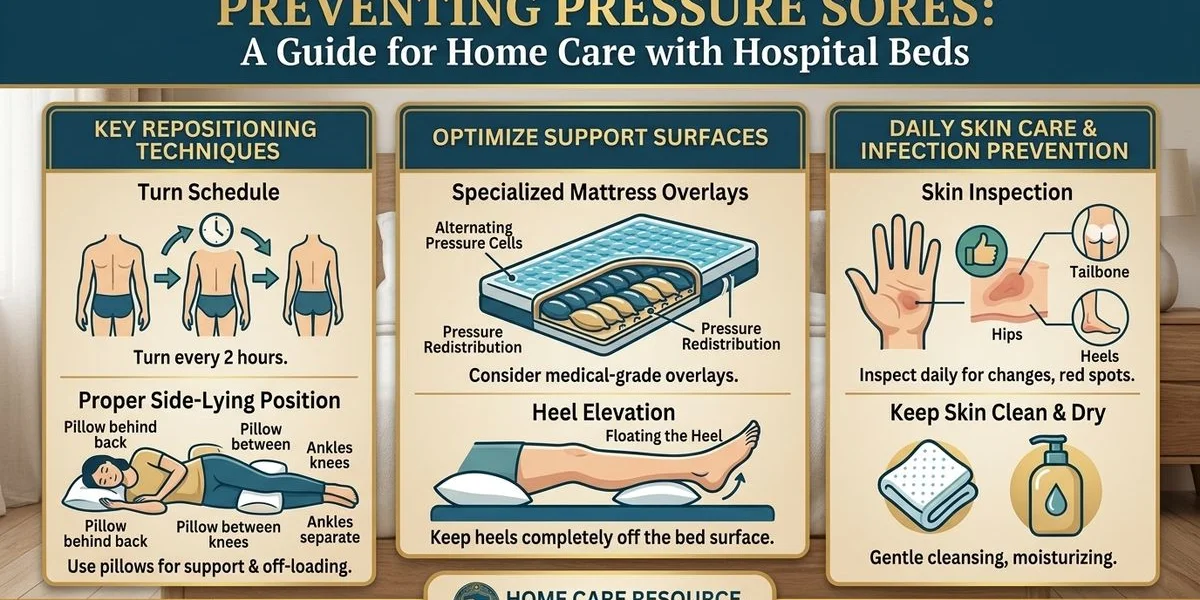
Preventing Pressure Sores
Patients who spend extended time in bed are at high risk for pressure ulcers. Tissue damage from unrelieved pressure begins in as little as two hours.
Pressure ulcer prevention starts with the right mattress and a regular repositioning schedule. We look to the 2025 National Pressure Injury Advisory Panel (NPIAP) guidelines for best practices. These guidelines recommend a multi-component prevention bundle combining repositioning, appropriate support surfaces, and nutritional optimization.
Dietary Needs for Skin Integrity
The Wound Healing Society recommends a significant increase in protein to heal wounds and prevent sores. They suggest 1.25 to 1.5 grams of protein per kilogram of body weight daily for post-surgical patients.
Choose a mattress appropriate for your loved one’s risk level. Innerspring mattresses offer basic support, while therapeutic foam and alternating-pressure mattresses provide superior pressure redistribution.
For patients who will be bedbound for more than a few days, a pressure-relief mattress is strongly recommended. Read our detailed guide on preventing pressure sores for more information.
Activities of Daily Living (ADLs) Station
Activities of Daily Living, which include eating, grooming, dressing, toileting, and bathing, are the milestones of recovery. Set up the room to support as much ADL independence as possible.
Bedside Table Organization
Keep essentials within an arm’s reach of the bed.
- Water bottle with a straw. Aim for at least 64 ounces of water daily to prevent post-surgery dehydration.
- Medications in a daily pill organizer with an alarm.
- Phone and charger.
- Tissues and a small waste bin.
- Reading glasses and remote controls.
- Call bell or baby monitor if the caregiver is in another room.
Overbed Table Essentials
An overbed table with a wheeled base, such as those made by Drive Medical, is essential for daily tasks. It allows the patient to eat meals while elevated in the semi-Fowler position. It also provides a stable surface for working on a laptop or brushing teeth over a basin.
Toileting Access
If bathroom access is difficult, a bedside commode eliminates the riskiest transfer of the day. Position it on the same side as the bed exit. Keep it close enough that the patient barely needs to stand to transfer safely.
Caregiver Ergonomics
Recovery strains both the patient and the caregiver. The National Institute for Occupational Safety and Health (NIOSH) strictly recommends a 35-pound maximum weight limit for manual patient lifting under ideal conditions.
Caregiver ergonomics is about setting up the room so that providing care does not lead to back injuries, exhaustion, or burnout. We train families to prioritize their own physical safety. A healthy caregiver is essential for a smooth recovery process.
Use the Bed Height
This is the most important ergonomic tool you have. When changing sheets, bathing, or performing wound care, raise the bed to your waist height. When the patient is resting or transferring, lower it. The ability to adjust bed height is one of the primary reasons a hospital bed is superior to a regular bed for home care.
Positioning Yourself
Stand close to the bed with your feet shoulder-width apart to maintain balance. Bend at the knees rather than the waist. Never twist while lifting or repositioning a patient. Always use a transfer belt for sit-to-stand transfers to distribute weight safely.
Take Mandatory Breaks
Caregiving is physically and emotionally demanding. Set up a comfortable chair in the recovery room where you can sit during quiet periods. Take turns with other family members when possible. The room should support the caregiver’s well-being too.

Essential Supplies Checklist
Stock the recovery room with these specific supplies before your loved one comes home. Proper preparation reduces post-discharge complications by up to 40%.
Medical Supplies
- Wound care materials as directed by the surgeon.
- Thermometer and a reliable pulse oximeter, such as the Innovo brand, to monitor oxygen levels.
- Blood pressure monitor.
- Ice packs or heating pad as recommended.
- Compression stockings if prescribed.
- Incentive spirometer for breathing exercises, aiming for the standard 1500ml target to keep lungs clear.
Comfort Items
- At least four extra pillows for positioning.
- Lightweight blankets, because heavy blankets can restrict movement.
- Lip balm to combat the dry lips caused by hospitals and medications.
- Earplugs and a sleep mask for daytime rest.
Practical Items
- Reacher or grabber tool to avoid bending.
- Long-handled shoe horn.
- Shower chair or bath bench.
- Raised toilet seat.
- Non-slip socks with rubber treads.
Communication and Emergency Planning
Post-surgical complications require an immediate response. We always tell families to prepare for the unexpected before the patient even leaves the hospital.
A fast response time makes all the difference during a crisis.
- Post the surgeon’s office number, the hospital’s nurse line, and 911 prominently in the room.
- Program emergency numbers into the patient’s phone.
- Know the specific signs of infection, blood clots, and medication reactions related to the surgery.
- Have a clear transportation plan for getting the patient back to the hospital quickly if needed.
- Consider a 2026 top-rated medical alert device, like Bay Alarm Medical or Medical Guardian, for patients who will be alone during the day.
Creating a Recovery Timeline
Work with the surgical team to create a week-by-week recovery plan. Visible progress is highly motivating for the patient.
- Medication schedules: Include precise tapering plans for pain management.
- Physical therapy: List specific exercises and daily frequency.
- Activity milestones: Track goals like sitting up, standing, walking to the bathroom, and eventually walking outside.
- Appointments: Mark all follow-up dates clearly.
- Restrictions: Note all lifting limits, driving restrictions, and shower timing rules.
Post this timeline on the wall where both the patient and caregiver can easily see it.
When to Seek Additional Help
Some recoveries are more demanding than a single family caregiver can manage. The 2025 Genworth Cost of Care Survey notes that the national median hourly rate for a non-medical in-home caregiver in the US is now $35 per hour.
Consider hiring professional home health aides if:
- The patient requires more than two hours of hands-on care daily.
- The patient weighs significantly more than the caregiver.
- The caregiver has their own health limitations.
- The caregiver is managing work and caregiving simultaneously.
Orlando has excellent home health agencies that can provide skilled nursing, physical therapy, and personal care assistance. Your surgeon’s office can usually provide referrals.
Getting Started
The best time to set up the recovery room is before the surgery happens. Use the days before the procedure to prepare the room, purchase supplies, arrange the hospital bed delivery, and walk through the plan with everyone involved.
At Orlando Home Hospital Beds, we offer hospital bed packages designed specifically for post-surgical recovery. These bundles include the bed, a therapeutic mattress, safety rails, an overbed table, and complete white-glove setup.
We can often deliver and set up within 24 to 48 hours for families facing urgent timelines. Visit our complete buying guide to learn more about choosing the right bed for your recovery room. Taking action early ensures a smooth transition back home.