How to Prevent Pressure Sores When Using a Hospital Bed at Home
We understand from our clinical fieldwork that learning how to prevent pressure sores when using a hospital bed at home is one of the most critical skills a caregiver can master. Pressure sores, also called pressure ulcers, bedsores, or decubitus ulcers, are one of the most common and preventable complications of extended bed rest. Unrelieved pressure can cause severe tissue damage in as little as two hours.
Our team sees how quickly a small red spot can escalate into a deep, life-threatening wound without the right interventions. Recent US medical data shows that 2.5 million Americans develop these injuries annually, costing the healthcare system nearly $26.8 billion. Many of these painful complications are highly preventable.
Let’s look at the data, what it is actually telling us, and explore practical ways to respond.
Understanding Pressure Ulcer Stages
Pressure ulcer stages range from mild skin irritation to severe, deep tissue damage. Catching these problems early is your best defense against complications.
Our protocol focuses heavily on stopping progression before the skin breaks. Medical data from 2026 shows that treating a single Stage 3 or Stage 4 pressure ulcer in the US can cost between $20,900 and $151,700. The financial and physical toll is immense.
Stage 1: Non-Blanchable Redness
The skin remains intact but shows a persistent red area that does not turn white when pressed. You might notice the area appearing blue or purple on darker skin tones. The patient may report pain, burning, or itching at the site.
Stage 2: Partial Thickness Skin Loss
The outer layer of skin breaks open, forming a shallow open wound, blister, or abrasion. The wound bed typically looks pink or red and moist. This stage is painful and requires immediate wound care to prevent further deterioration.
Stage 3: Full Thickness Skin Loss
The wound extends through all layers of skin and into the fatty tissue beneath. It often looks like a crater at this point. While bone and tendon are not yet visible, the wound is serious and requires professional medical attention.
Stage 4: Full Thickness Tissue Loss
The wound extends deeply into muscle, bone, tendon, or joint spaces. This is a medical emergency requiring professional wound care, often including surgical debridement. These severe ulcers carry a high risk of life-threatening infections.
Unstageable
The wound base is covered with dead tissue called eschar, making it impossible to determine the true depth. A doctor must professionally assess and treat this condition.
The goal is simple: never let a pressure sore get past Stage 1. With the right hospital bed, mattress, and care routine, most pressure injuries are completely preventable.
Where Pressure Sores Develop
Pressure sores develop wherever bone presses skin tightly against a surface. The most common problem areas depend directly on the patient’s resting position.
Our experience shows that the sacrum and heels are the most vulnerable spots. Clinical studies indicate that using a bed with a Zero Gravity positioning feature can reduce peak interface pressures at these specific locations by over 30%.
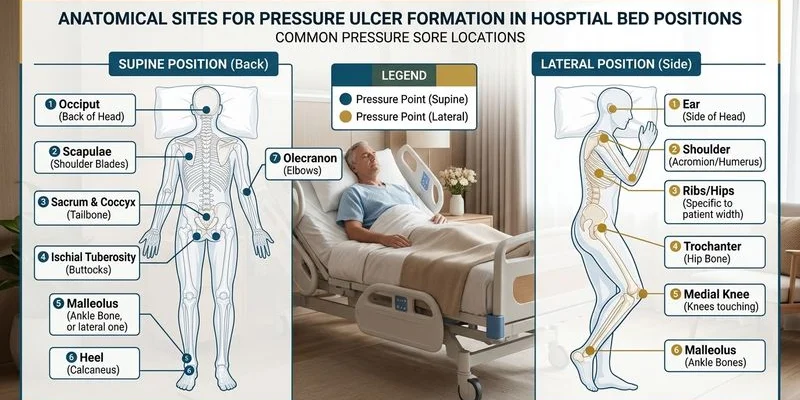
When lying on the back (supine):
- Heels (the most common site)
- Sacrum (base of the spine)
- Shoulder blades
- Back of the head
When lying on the side (lateral):
- Hip bones (greater trochanter)
- Knees (where they press together)
- Ankles (where they press together)
- Ears
When sitting up in bed (Fowler position):
- Tailbone (coccyx)
- Ischial tuberosities (sitting bones)
- Shoulder blades
Checking these pressure points tells you exactly where to look during daily skin inspections. This helps you focus your prevention efforts right where they matter most.
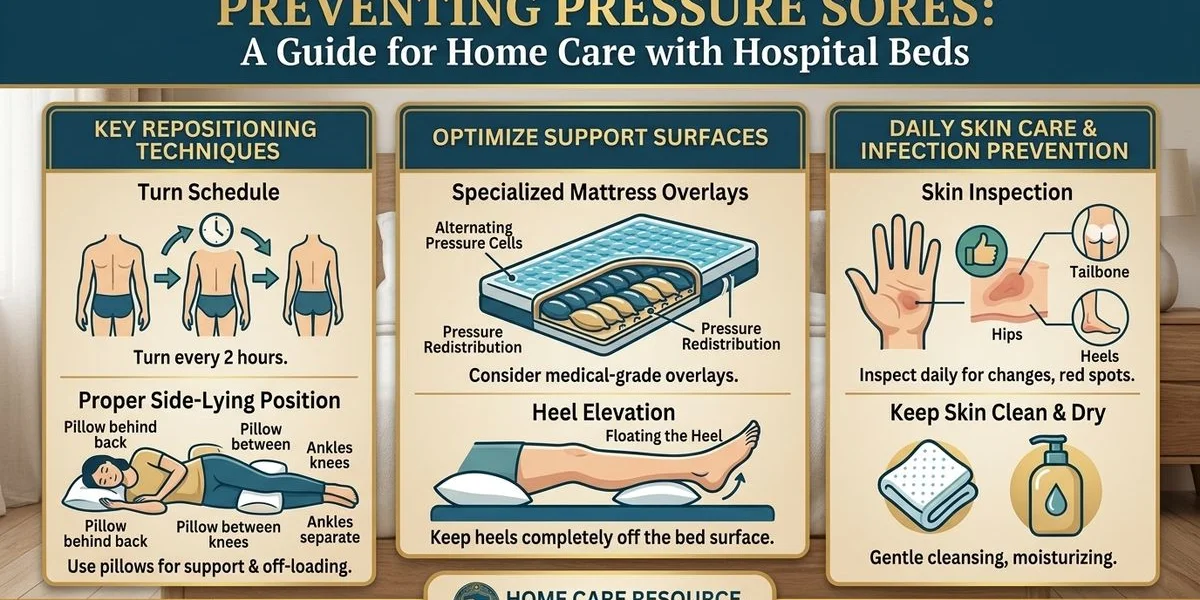
How to Prevent Pressure Sores When Using a Hospital Bed at Home: The Role of Repositioning
A consistent repositioning schedule is the absolute foundation of pressure sore prevention. The traditional standard was to change the patient’s position at least every two hours.
We recommend adapting this based on the newest 2025 guidelines from the National Pressure Injury Advisory Panel (NPIAP). The NPIAP now stresses individualized care that includes frequent “micromovements” to relieve pressure without constantly disrupting sleep.
Creating a Repositioning Schedule
Here is a sample schedule that rotates through four positions over an eight-hour period:
| Time | Position | Notes |
|---|---|---|
| 8:00 AM | Back, head elevated 30 degrees | Skin check during morning care |
| 10:00 AM | Right side | Pillow between knees and ankles |
| 12:00 PM | Back, head elevated for lunch | Heel protection in place |
| 2:00 PM | Left side | Pillow between knees and ankles |
| 4:00 PM | Back, head elevated 30 degrees | Skin check |
Post the schedule near the bed and log each turn carefully. Caregivers often lose track of time, especially during long nighttime hours when everyone is tired.
Repositioning Techniques
Your hospital bed’s electric adjustments are powerful tools for safe patient handling.
- Raise the head of the bed to shift weight off the sacrum and onto the back. Keep it below 30 degrees for extended periods to avoid shear forces on the tailbone.
- Lower the head flat before turning the patient to prevent dangerous skin tearing.
- Raise the foot section slightly to stop the patient from sliding down the mattress.
- Use the Hi-Lo feature to bring the bed to waist height. This protects your own back and provides better leverage during repositioning.
A fully-electric hospital bed makes this process significantly easier. Every adjustment is instantly available at the touch of a pendant control.
Choosing the Right Mattress
The mattress serves as your primary pressure redistribution surface. It controls how much force concentrates at each bony contact point.
We always advise families to understand US Medicare classifications when shopping for medical support surfaces. Medicare categorizes these mattresses into specific groups based on their therapeutic capabilities.
Therapeutic Foam Mattress (Group 1)
A therapeutic foam mattress uses multiple layers of varying densities to distribute weight evenly. High-quality models feature viscoelastic memory foam that conforms to the patient’s body shape, reducing peak pressure at bony prominences.
Best for: Patients at moderate risk who can reposition with some assistance.
Alternating Pressure Mattress (Group 2)
An alternating pressure mattress uses an electric pump to inflate and deflate alternating air cells on a timed cycle. This creates continuous micro-movement that mimics physical repositioning, periodically relieving pressure at every contact point.
Best for: High-risk patients who cannot move independently and spend most of their day in bed.
Low Air Loss Mattress (Group 2)
These premium surfaces combine air cells with a permeable cover that blows air against the patient’s skin. This technology keeps the skin cool and dry while providing elite pressure redistribution.
Best for: Patients with existing pressure injuries or those at the absolute highest risk level.
Gel Overlay (Group 1)
A gel pad placed over a standard mattress adds a basic layer of pressure distribution. A gel overlay provides decent supplemental protection, though it is less effective than full therapeutic systems.
Best for: Low-risk patients needing an additional preventive measure.
For a detailed comparison of all mattress types, read our hospital bed mattress comparison guide.
Skin Care and Nutrition
Prevention relies on more than just medical equipment. A patient’s skin health and daily nutrition play equally critical roles.
Skin Care
Moisture is a dangerous accelerant for skin breakdown. Clinical data shows that skin exposed to incontinence can begin taking damage in just 10 to 15 minutes.
- Keep skin clean and dry: Quickly remove moisture from sweat, urine, or wound drainage.
- Use pH-balanced cleansers: Harsh bar soaps strip away the skin’s natural protective barrier.
- Apply barrier cream: Use products containing zinc oxide or dimethicone, like Coloplast Atrac-Tain or Baza, to protect the sacral area.
- Never massage red areas: Rubbing damaged tissue causes further tearing under the surface.
- Inspect the skin daily: Check every pressure point thoroughly during morning care.
Nutrition
Poorly nourished patients develop sores much faster and take significantly longer to heal.
- Protein: This is essential for tissue repair. Target 1.2 to 1.5 grams per kilogram of body weight daily for at-risk patients.
- Vitamin C: This nutrient supports necessary collagen formation and immune system function.
- Zinc: This mineral is critical for cellular repair and wound healing.
- Hydration: Dehydrated skin breaks down easily, so ensure adequate fluid intake throughout the day.
- Therapeutic Supplements: Consider specific clinical nutrition drinks like Juven or Ensure if appetite is low.
If your loved one struggles to eat enough, consult a doctor about adding these specialized supplements to their diet.

Additional Prevention Strategies
Protecting the most vulnerable areas requires specific, targeted interventions.
Heel Protection
Heels are the second most common location for pressure ulcers and demand dedicated offloading tools.
- Heel elevation pillows that suspend the heels entirely off the mattress surface.
- Specialized heel boots, such as the Prevalon Heel Protector, which uses a Dermasuede interior to cushion the foot while preventing foot-drop.
- Raising the foot of the bed slightly to shift weight away from the lower legs, but not so much that the patient slides down.
Reduce Friction and Shear
Friction happens when skin rubs directly against the sheets. Shear occurs when deeper tissue layers slide against each other, typically when a patient slides down an elevated bed.
- Use a Medline friction-reducing draw sheet to reposition the patient safely. You should never drag them across the mattress.
- Keep the head of the bed below 30 degrees whenever possible to minimize sliding.
- Apply a silicone-bordered foam dressing, like Mepilex Border Sacrum, to the tailbone to absorb shear forces before they damage the skin.
- Use silk or satin pillowcases to reduce friction on the ears and back of the head.
Manage Moisture
Incontinence drastically increases the risk of breakdown because wet skin softens and tears easily.
- Use highly absorbent underpads equipped with a moisture-wicking top layer.
- Change wet pads immediately to prevent prolonged skin contact.
- Reapply a thick moisture barrier cream after every single cleaning.
When to Seek Medical Help
Early intervention is the key to preventing catastrophic wounds.
Our experts recommend contacting a healthcare provider immediately if a Stage 1 red spot fails to improve within 48 hours. Stage 3 or 4 injuries are classified by Medicare as “never events” in hospitals, and they escalate just as dangerously in a residential setting.
Watch for these critical warning signs:
- Any break or crack in the skin, no matter how tiny.
- Unusual warmth, swelling, or tenderness around a bony area.
- Signs of sepsis or infection, such as fever, foul odor, or increasing drainage.
- A wound that continues expanding despite your strict prevention routine.
A Stage 1 injury can often reverse course in a few days with proper offloading. Advanced injuries often require surgical intervention and months of recovery.
Building Your Prevention Kit
Stocking the right medical supplies makes your daily caregiving routine much safer.
Keep these specific items easily accessible near the bed:
- Body positioning wedges (foam wedges hold patients in the 30-degree tilt better than standard pillows).
- Prevalon heel protectors or similar offloading boots.
- Zinc-oxide moisture barrier creams, such as Baza or Cavilon.
- Mepilex Border Sacrum foam dressings for high-risk tailbone protection.
- High-absorbency underpads and Medline draw sheets.
- Skin inspection mirror for hard-to-see areas.
- Repositioning log sheet.
The Right Bed Makes Prevention Easier
A premium hospital bed paired with a therapeutic mattress is your absolute strongest defense against pressure injuries.
Our Orlando team regularly helps families configure the ideal setup for their specific medical needs. For detailed guidance on preparing the entire care space, read our guide on setting up a home recovery room. The right bed provides the essential pressure redistribution surface required to keep skin safe, addressing the mechanical causes of pressure sores while making your caregiving routine more manageable.
Explore our hospital bed packages that pair beds with therapeutic mattresses designed for pressure prevention, or visit our complete buying guide to understand all your options. We are here to help you assess your loved one’s risk level and recommend the perfect equipment combination to ensure their comfort and safety.
Figuring out how to prevent pressure sores when using a hospital bed at home requires diligence, but you do not have to do it alone.